How to edit sections on the guide track
CueWee automatically splits each song into sections (intro, verse, chorus, bridge, solo, outro). You can adjust those sections, add pre-counts, and manage the cues that play in each part.
Where the sections live
On the player’s timeline, above the tracks, you see colored bars representing the song’s sections. Each bar is a segment with:
- A name (e.g., Intro, Verse 1, Chorus)
- A color for visual identification
- Associated cues (voice announcements that play at the start of the section)
Open the section menu
On desktop: right-click the segment you want to edit. On mobile: press and hold it. The section menu opens just above the section.
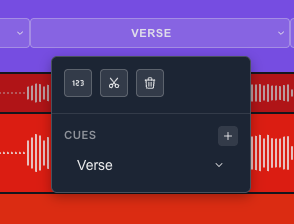
Available actions
Toggle pre count (123)
Adds or removes pre-count bars before that section. Useful for:
- Practicing the entrance of a specific part
- Giving the band time to prepare before the chorus
- Inserting a countdown at important transitions
Split segment (blade)
Splits the current segment in two at the playhead when the playhead is inside that segment. If the playhead is outside it, the segment is split at its midpoint. When beat data is available, the cut snaps to the nearest beat. Use it when you want to:
- Mark a sub-division within a section (e.g., “Verse 1A” and “Verse 1B”)
- Create an intermediate cue in the middle of a long part
Delete segment (trash 🗑)
Removes the segment. The previous and next parts merge together.
⚠️ This action can be undone by reopening the song. But if you export before undoing, the export will reflect the edited structure.
Move where a section starts and ends
Sections sit side by side with no gaps between them, so a section's end is the next one's start. Moving that point is one edit, and both sections change together.
There are two ways to move it, and both are available everywhere.
Drag the handle. Each section has a handle on its left edge, right where it meets the previous one. Drag it to move the boundary. It lands on the nearest beat, and holding Shift while dragging places it freely, between beats. The handle needs a mouse or a trackpad, so it does not appear on a touch screen.
Step it from the section menu. Open the section menu (right click the section, or press and hold it on a touch screen) and click the button at the end of the row, the one that adjusts start and end. Start and End rows appear right below the buttons. Each arrow moves that edge one beat, and the value between the arrows shows where it landed. It uses the same unit as the timeline ruler: bar and beat (for example 12.3, bar 12, beat 3) when the ruler shows bars, or minutes, seconds and tenths when it shows time. A song without beat detection always reads in time, and its arrows step by one beat worked out from the song's BPM, or by a tenth of a second when the BPM is unknown. The value updates as you click, so you can watch the section grow or shrink without closing the menu. This works on a computer too, and it is the precise option when a beat is only a few pixels wide.
The last section's End row is disabled, because a song's end is fixed.
A boundary never reaches its neighbors. It stops one bar short on either side, so two sections can never start at the same point and no section can shrink to nothing. When an arrow has nothing left to give, it turns grey.
Cues — voice announcements
Each section can have one or more cues (voice announcements) that play at the start of the section, telling the band what’s coming.
At the bottom of the menu you’ll find:
- Ready-made cues, grouped as Sections, Performance, and My guides — Intro, Verse, Chorus, Bridge, Outro, Solo, and more
- New Custom Guide — creates a cue in your own words. See How to create your custom guide.
- The cues already in this section — each one has an X button to remove it
You can assign multiple cues to the same section. For example, at the start of the chorus, you can play “Chorus” followed by “1, 2, 3, 4.”
Practical tips
- For rehearsals: keep cues short and direct (“Verse,” “Chorus”)
- For live performances: prefer countdown cues (“4, 3, 2, 1”) at critical transitions
- For important sub-divisions: use Split segment plus a custom cue (for example, “Break”)